Although I make as part of my living it is still also my favourite hobby and now and then it’s lovely to work with a new material and make something just for the pleasure of it. This weekend I got out some of the birch bark that I collected on a North West Coppice Association day in the spring. It’s thin, delicate stuff to work with and needed a fair bit of preparation to clean and smooth out the surface. I followed a traditional pattern, cutting notches into each end of a strip of bark which is then curled round and interlocked. A second piece of bark is glued inside to add strength and so the inside and outside of the pot can have the smooth inner bark showing though I decided I wanted the outer bark on the inside for texture. While the glue sets I used carved blocks and wedges to press the layers together. A handy hazel stick was cleft and shaved to make the base and lid. I carved the lid with a taper so it is a snug push fit and the pot makes a satisfying subtle ‘pop’ when opened. The handle is another piece of hazel with a round tenon carved onto it which passes through the lid and is fixed with a tiny peg inside.
It seemed to occupy a lot of the weekend though I wasn’t working on it solidly and it was very pleasing and satisfying to do. I’m very pleased with the result and will definitely make some others.
One of the most exciting parts of the spooncarving course with Fritiof Runhall last week was his advice on learning to carve with both hands. By making the same cuts with the same angles but mirrored by using the other hand is the truest way to achieve symmetry in carving. Normally, when carving the outline shape of a spoon one side has to be carved looking from underneath. If you use both hands you can work on each side without turning the spoon and while looking at it from the same angle. I started with practising axing with the left hand which was a brilliant experience. I kept swapping the axe back and forth to feel the action in my dominant hand and try to copy it in the other. The key is to relax and be confident at which point I started to feel comfortable with it and quickly got the accuracy to start axing spoon blanks with both hands. After that I worked on some simple knife cuts and straight away saw the benefits. It was also really fascinating to have to ‘learn’ to carve again, examining the way my hands normally work together and transpose this across to the other side. It’s a brilliant exercise for anyone thinking of starting to teach spooncarving. You also see how the ‘non-dominant’ hand is doing just as skilled work in holding and manipulating the spoon while adding support to the cut.
Since then I’ve been swapping hands on all kinds of tasks from brushing my teeth to operating the computer mouse and cutting vegetables. It all helps build dexterity, confidence and ease of motion into the ‘other’ hand and best of all, it’s fun.
Update 12/10/11: Unfortunately the National Trust today contacted me to say they have cancelled this year’s event due to the recent rain and condition of the fields.
On Sunday 16th Oct I’ll be at Acorn Bank near Penrith for their Apple Day fair. Last year I had a fanstastic time talking about scythes and mowing and hayrakes so this time I’ve arranged to do a mowing demonstration as well as having some of my greenwood work for sale. Hopefully despite the recent weather there will be some decent grass and I’ll convince a few more people to leave the strimmer in the shed and start enjoying cutting the grass.
Acorn Bank Garden
Temple Sowerby
Penrith
Cumbria
CA10 1SP
Date: 16 October 2011
Time: 11am – 4.30pm
Cost: Adult £6, Child £3, Family £15 (including National Trust members) Get directions
Last week I spent 3 days in Edale as a student on a spooncarving course organised by Robin Wood and taught by Swedish carver Fritiof Runhall. I’ve been carving spoons from green wood for 8 years, so when I first heard about the course I was intrigued but unsure what I would learn. During a visit in early summer, Robin talked me into signing up and I’m very glad he did. Many of you will already have read about the course on Robin’s blog Greenwood Carving so here I’ll just add my own impressions and experiences.
I arrived expecting to be inspired by beautiful craftsmanship and to spend a few days enjoying carving spoons in good company but what I hadn’t expected was to learn so much from Fritiof and his spoons. Right from the start there were new ideas and techniques that surprised, impressed and inspired me. It was very interesting just to watch him work, spot similarities in our techniques and try to emulate and learn from the differences.
To get a deeper understanding of Fritiof’s techniques and style I spent the days making copies of some of his work. Some of this took the form of completed spoons, some where just carvings of handle details. Not only will these act as 3-dimensional references of shapes with size and thickness but taught me much more about spoon carving and Fritiof’s use of bevels, notches and knifework than I would have got by drawing, photographing or even taking home the original.
One of the favourite items on show, and not for sale, was a little bowl carved with a cheeky animal head. I have carved some bowls with duck heads and like the idea of kitchenware with character so spent one morning carving one for myself. This first attempt was time-consuming but I could see how it is actually made up of some relatively simple forms with a layer of fine embellishment on top and I will definitely be carving some more items like this.
In between the course I had the pleasure of spending many hours chatting about spoons with Rob, Fritiof and Barn who was up from his new Bristol spooncarving base. I even managed to get in a conversation with with Fritiof about scythes as he not only mows but makes snaths and hayrakes too.
I’ll finish with a couple of photos of Fritiof’s beautiful spoons:
Last week, during the hottest days of the year, Christiane and I met up and spent a few days camping near Salisbury. I took along a small lump of the damson wood I’ve been working with and a spooncarving kit of axe and knives. Sitting together out in the fresh air making spoons is a lovely way to spend the day. Christiane did her first greenwood carving when we met in 2009 and has only recently started to carve more regularly so I’m impressed by how she works with the tools and wood. We work together, I demonstrate the different cuts and offer advice on the shape and then Christiane takes over. She is very observant and has a good eye which you can see in the final spoon.
We made a pair of spoons each with me trying out a couple of new design ideas and warming up for the spoon carving course I’m going on tomorrow. I’ll have 2½ days in Edale learning spoon carving techniques from Swedish carver Fritiof Runhal in the company of other greenwood workers from around the country. I can’t wait.
I got back last night from the second round of filming the mowing scenes for Anna Karenina by Tolstoy. While we were away somebody told us about that the filming had made the papers because of extras being supposedly underpaid. Read the article in the Independent here.
Well, I can understand that there should be a minimum wage for this kind of work the same as anything else but, to be honest I can’t imagine who of our group would have complained. Everyone I spoke with agreed that it was great fun and the pay was a bonus for the chance to mow together in a huge team of scythers. A lot of the time we just hung around in our false beards or peasant dresses soaking up the sun and atmosphere.
All the production team were helpful and friendly, and patient with our inexperience of the film industry and constant early-morning peening. Getting paid to hang out with friends, have a laugh and dress up as Russian peasants? No complaints here.
My skin-on-frame recovery kayak attracted a fair bit of attention as soon as I drove into the campsite at Ullswater with it on the roof of the car. I was suprised how many people remembered and recognised it from 2 years earlier when it was unskinned.
Straight away I had to start explaining that, even though it had been finished for 12 months, it’d never been in the water and I was just looking for someone to test it for me. Even once I’d explained that I don’t know how to kayak Richard, Dave and James insisted I be the first person in it on the water, lent me a jacket and life vest and promised not to let me drown. It did feel very exciting to carry the kayak down to the water knowing that this was the real moment of truth and I would find out whether it would actually work. Once I’d managed to get inside, using the paddle to balance I was grateful that Dave and Richard were there to stabilise things. The recovery kayak is designed for surf and manoeuvrability so it feels unstable for a complete novice like me but once I’d got back out Richard took over to show how it’s done and it was brilliant to see it properly in action.
I like peening for all sorts of reasons but one of my favourite aspects is the amazing rhythms which are created by several people peening scythes together. The hammering comes in and out of sync in a way I find really exciting. At lunchtime today Chris commented that it reminds him of the music of Steve Reich. I’d never heard of it before but have been listening mesmerised while I blog. Here is Evelyn Glennie performing ‘Clapping Music’ which is really reminiscent of peening. Listen while you read about the workshop.
Another great group of folk made for a fun and interesting day for this year’s scythe peening course. I was especially pleased that Jim and Chris came up from Cambridge and Hampshire respectively for the course.
We began with a discussion of why peening is important and how to judge when your scythe is in need of peening. Then it was on to practicals with a look at getting the setup right and choosing tools, particularly this year with respect to peening hammers which I’ve been exploring during the summer. Most people were familiar with the jig but had struggled with this turning up the edge of the blade. It’s a common problem which is easy to solve so we were able to speed through that and get on to the real fun and intrigue of freehand peening with the anvil. In a beginner’s mowing course there isn’t enough time to teach all the ins and outs of peening (it’s a lot to fit into one day on it’s own) and there’s really only so much you can get from reading a book or even watching a video. There were several ‘eureka’ moments during the day when I explained something that suddenly clicked the pieces into place such as the benefits of a cut-down hammer and getting the lighting right. I was learning too, techniques for corrective treatment for curled-over edges and coping with scythe blade edges which had become very thick through years of not peening. We made great progress through the day and everyone’s technique improved a huge amount, ready to go away and put in the practice with the foundation of the techniques and knowledge. We finished the day with some sharpening with whetstones. Once your peening is good this isn’t necessary but if you can still see light reflecting up off the scythe edge then it’s not sharp and some work with the whetstone is needed. That’s especially true with the jig but often forgotten or not mentioned when people demonstrate it’s use.
In all, a great day that passed in a flash, thanks to all who made it happen.
Way back in 2008, the guy I was working with asked me to go to the library and look for a book on currachs, Irish fame boats. Instead I found ‘The Aleutian Kayak’ by Wolfgang Brinck and fell in love with the photos of his willow-ribbed skin on frame baidarka. The simple technology in this lighweight but seaworthy craft is truly beautiful and I decided that I would make myself a greenland kayak.
The baidarka, a fast rocket of a kayak made for ocean journeys, calls for 15ft lengths of straight, knot-free timber which though maybe common in the US wasn’t available to me in Devon. So I decided instead to make my first project a ‘recovery kayak’ from ‘Building skin on frame boats’ by Robert Morris. This is a much smaller kayak, a modern interpretation of a traditional kayak used to recover seals shot from the shore.
At the time I was working in a small sawmill which focussed on sawing oak and western red cedar for the building trade. I kept my eyes open and, on spotting a clean board, snapped it up for milling into the dimensioned components. Very little wood is needed to build a kayak like this as the skeleton framework is so well designed for lightness and strength. Apart from the bow and stern blocks no glue, nails or screws are used. All the joints are morticed and pegged or lashed together using artificial sinew to give the kayak flexibility to absorb the shocks from the sea.
Designing a boat was something completely new for me and a really intersting challenge. A kayak is designed and built to it’s owner and the traditional measurements are all based on that person’s body: armspan, cubit and fist. Getting the right length and volume of kayak is crucial so the kayak is a close fit but with enough bouyancy.
The framework took 18 months of work on a casual, now and again basis. Of course it could have been made a lot quicker but I was not in a rush and savouring the process of the framework coming together. The ribs are steamed into shape while the masik (curved brace over the paddler’s knees) and cockpit coaming were steamed and laminated for strength. When making my paddle, a traditional unfeathered greenland pattern, I was on more familiar ground and carved from a single piece of cedar using axe, knife and spokeshave. Also during this time I thought I should learn to swim and took lessons in my local pool!
By the autumn of 2009 the framework was complete and I was living in Cumbria, working on a log cabin project. I was struggling with the book’s instructions on how to skin the kayak and searching online for advice when I came across a post on a forum for a Traditional Kayak Meet, in Cumbria – a whole weekend of people interested in building and paddling greenland kayak, and it was that very weekend. I quickly dashed off an email for details and late on sunday evening strapped my frame onto the car. Previously I’d thought I was the only person interested in these kayaks, I couldn’t find a club or shop that had even heard of them. It was a thrill to see so many greenland kayaks and baidarkas together and meet Richard, Bill and others who are so knowledgeable on the subject and have taken their kayaks paddling around greenland. They were very complimentary on my work so far, gave me plenty of advice and instruction on skins and I came away ready to tackle the next stage.
In a way it was a shame to sew the beautiful frame into it’s skin of ballistic nylon. Now complete it then stood in various sheds and barns for over a year. I’m not a kayaker and, despite the success of the swimming lessons, I’m a definite earth sign and much happier with my feet on solid ground. For me the pleasure was in the woodworking and creating this lightweight, elegant craft. At the same time I was curious to know how it would work and I got my chance just last weekend.
The Lyth Valley, close to where I live is famous for it’s damsons which are out at the moment. It’s a good year in terms of the crop but difficult harvesting, I’m told because of the wet weather.
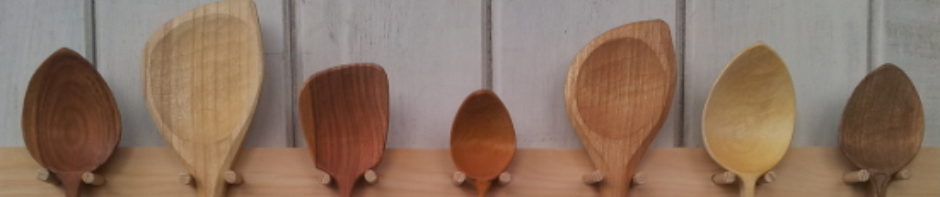
I’ve used my own harvest so far to make jam and damson vodka and some wood from an earlier pruning to carve these eating spoons. I split them out radially so I get the colours of the heartwood and sapwood together in each spoon which makes them really stunning.
I made 7 from the log and I’m already using one. The others are £15 + £5 p&p. To order, please use the order form.
Privacy & Cookies: This site uses cookies. By continuing to use this website, you agree to their use.
To find out more, including how to control cookies, see here:
Cookie Policy
 Although I make as part of my living it is still also my favourite hobby and now and then it’s lovely to work with a new material and make something just for the pleasure of it. This weekend I got out some of the birch bark that I collected on a North West Coppice Association day in the spring. It’s thin, delicate stuff to work with and needed a fair bit of preparation to clean and smooth out the surface. I followed a traditional pattern, cutting notches into each end of a strip of bark which is then curled round and interlocked. A second piece of bark is glued inside to add strength and so the inside and outside of the pot can have the smooth inner bark showing though I decided I wanted the outer bark on the inside for texture. While the glue sets I used carved blocks and wedges to press the layers together. A handy hazel stick was cleft and shaved to make the base and lid. I carved the lid with a taper so it is a snug push fit and the pot makes a satisfying subtle ‘pop’ when opened. The handle is another piece of hazel with a round tenon carved onto it which passes through the lid and is fixed with a tiny peg inside.
 I started with practising axing with the left hand which was a brilliant experience. I kept swapping the axe back and forth to feel the action in my dominant hand and try to copy it in the other. The key is to relax and be confident at which point I started to feel comfortable with it and quickly got the accuracy to start axing spoon blanks with both hands. After that I worked on some simple knife cuts and straight away saw the benefits. It was also really fascinating to have to ‘learn’ to carve again, examining the way my hands normally work together and transpose this across to the other side. It’s a brilliant exercise for anyone thinking of starting to teach spooncarving. You also see how the ‘non-dominant’ hand is doing just as skilled work in holding and manipulating the spoon while adding support to the cut.
 Last week I spent 3 days in Edale as a student on a spooncarving course organised by


 I got back last night from the second round of filming the mowing scenes for Anna Karenina by Tolstoy. While we were away somebody told us about that the filming had made the papers because of extras being supposedly underpaid. Read the article in the Independent
  My skin-on-frame recovery kayak attracted a fair bit of attention as soon as I drove into the campsite at Ullswater with it on the roof of the car. I was suprised how many people remembered and recognised it from 2 years earlier when it was unskinned.
 It did feel very exciting to carry the kayak down to the water knowing that this was the real moment of truth and I would find out whether it would actually work. Once I’d managed to get inside, using the paddle to balance I was grateful that Dave and Richard were there to stabilise things. The recovery kayak is designed for surf and manoeuvrability so it feels unstable for a complete novice like me but once I’d got back out Richard took over to show how it’s done and it was brilliant to see it properly in action.

 Another great group of folk made for a fun and interesting day for this year’s scythe peening course. I was especially pleased that Jim and Chris came up from Cambridge and Hampshire respectively for the course.
 look at getting the setup right and choosing tools, particularly this year with respect to peening hammers which I’ve been exploring during the summer. Most people were familiar with the jig but had struggled with this turning up the edge of the blade. It’s a common problem which is easy to solve so we were able to speed through that and get on to the real fun and intrigue of freehand peening with the anvil. In a beginner’s mowing course there isn’t enough time to teach all the ins and outs of peening (it’s a lot to fit into one day on it’s own) and there’s really only so much you can get from reading a book or even watching a video. There were several ‘eureka’ moments
  during the day when I explained something that suddenly clicked the pieces into place such as the benefits of a cut-down hammer and getting the lighting right. I was learning too, techniques for corrective treatment for curled-over edges and coping with scythe blade edges which had become very thick through years of not peening. We made great progress through the day and everyone’s technique improved a huge amount, ready to go away and put in the practice with the foundation of the techniques and knowledge.
 We finished the day with some sharpening with whetstones. Once your peening is good this isn’t necessary but if you can still see light reflecting up off the scythe edge then it’s not sharp and some work with the whetstone is needed. That’s especially true with the jig but often forgotten or not mentioned when people demonstrate it’s use.


