Yesterday I was in London for an interview with the Queen Elizabeth Scholarship Trust. The trust, which was established in 1990, gives funding to support practising craftspeople in gaining training or experience to further their careers. My scholarship, if I’m selected, will enable me to spend 3 weeks in Sweden working with Fritiof Runhall, one of the best greenwood carvers in the world as well as visiting other craftspeople in the area and researching old wooden spoons in several museums there.
 The interview was just 20 minutes long with a panel of craftspeople and designers, most of whom are Royal Warrant holders for their craft and including two woodworkers. I did feel quite daunted to be presenting to them but I’d had some good advice in advance that it would be relaxed and that proved to be right. I took a selection of my wooden spoons, a large carved bowl and a shrink pot container to show and, by the time I’d got in the room and said hello, the various members had the work in their hands – always a good sign. I’d been told that I would have 10mins to present my proposal followed by questions from the panel but actually I talked for just a couple of minutes before they jumped in with questions on how I work, the advantages and problems of greenwood, why I want to learn from Fritiof, pricing my craft, creating a carved finish instead of sanding and where I think I’m headed. It was all pretty intense but exhilerating at the same time and was over in a flash; it reminded me of teaching at Spoonfest – trying to put across a lot of information about what I do in a short time to a group of highly interested people.
I should find out by friday whether I’ve been awarded the Scholarship but in many ways I already feel like I’ve been successful. The fund website states they are looking for “Well thought out proposals which will contribute to the excellence of modern and traditional British crafts” from craftspeople who can demonstrate they “already have a high level of skill and are firmly committed to your craft or trade”. To have been selected on that basis from 300 applicants for one of only 30 interviews is a huge compliment and mark of recognition, not only for my own work but for the relatively unknown craft of greenwood carving and spoon making in the UK.
Keep your fingers crossed and I’ll let you know when I hear the news.
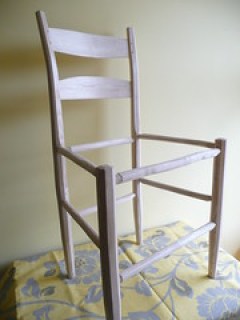 I’ve just finished assembling the frame for the Jennie Alexander side chair. I altered the rungs slightly, to give this chair the same seat size as my other dining chairs and put in just 4 rungs with different postitions. I wanted to lighten the look of the chair and give it some ‘lift’ so it appears more free. I’m confident that the structure, based on oval tenons and interlocking joints in the seat, is still strong enough for everyday use and I’m very happy with the final look.
 My second museum on the trip through Scotland was the


 My Learn to Scythe course in May is now full with places booking up on the June and September dates too. I’ve been getting steady interest since before Christmas and it’s a great indication that the interest in scything is picking up as people get away from powered garden machinery and use the scythe instead. It’s also encouraging that so many people recognise that mowing is a skill that’s worth investing time in to learn.
 I have two more Learn to Scythe courses in Cumbria on 28 June and 7 Sept 2013.
 On my way up to teach a ‘Learn to Scythe’ weekend at Forres last summer I took the opportunity to visit two museums on the way and see if I could find out more about the Scottish scythe. In 2011 I’d been given a Scottish snath of the familiar Y shape and was interested to find out why it had developed and it’s use.


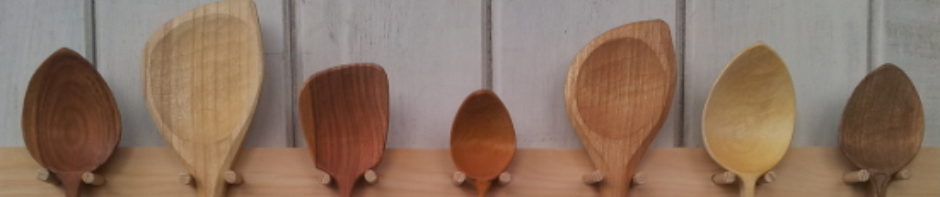
 I’ve been making and selling wooden spreaders for 10 years. They’re lovely things to use in the kitchen and a perfect carving project for learning knife techniques for spooncarving. On my spooncarving courses we make a spreader together on the first day to practise the different knife holds and learn about carving with the grain. Even for more advanced carvers they make an interesting project.


 Many thanks to Debs and all the staff at Highgrove who made us feel very welcome and to David at Home Farm where we camped during the stay.


-
Recent Posts
-
Privacy & Cookies: This site uses cookies. By continuing to use this website, you agree to their use.
To find out more, including how to control cookies, see here: Cookie Policy - June 2026
- April 2026
- March 2026
- December 2025
- October 2025
- August 2025
- July 2025
- June 2025
- May 2025
- April 2025
- March 2025
- February 2025
- November 2024
- September 2024
- August 2024
- July 2024
- June 2024
- May 2024
- April 2024
- March 2024
- January 2024
- November 2023
- August 2023
- July 2023
- June 2023
- May 2023
- April 2023
- February 2023
- January 2023
- October 2022
- September 2022
- August 2022
- July 2022
- June 2022
- May 2022
- April 2022
- March 2022
- January 2022
- November 2021
- August 2021
- July 2021
- June 2021
- May 2021
- April 2021
- March 2021
- February 2021
- January 2021
- December 2020
- November 2020
- October 2020
- September 2020
- August 2020
- June 2020
- May 2020
- March 2020
- February 2020
- December 2019
- November 2019
- September 2019
- August 2019
- July 2019
- June 2019
- May 2019
- April 2019
- March 2019
- November 2018
- September 2018
- June 2018
- May 2018
- April 2018
- March 2018
- February 2018
- January 2018
- December 2017
- October 2017
- September 2017
- August 2017
- July 2017
- June 2017
- May 2017
- April 2017
- March 2017
- February 2017
- January 2017
- December 2016
- October 2016
- September 2016
- August 2016
- July 2016
- June 2016
- May 2016
- April 2016
- March 2016
- February 2016
- October 2015
- September 2015
- August 2015
- July 2015
- June 2015
- May 2015
- April 2015
- March 2015
- February 2015
- January 2015
- December 2014
- November 2014
- October 2014
- September 2014
- August 2014
- July 2014
- June 2014
- May 2014
- April 2014
- March 2014
- February 2014
- January 2014
- December 2013
- November 2013
- October 2013
- September 2013
- August 2013
- July 2013
- June 2013
- May 2013
- April 2013
- March 2013
- February 2013
- January 2013
- December 2012
- November 2012
- October 2012
- September 2012
- August 2012
- July 2012
- June 2012
- May 2012
- April 2012
- March 2012
- February 2012
- January 2012
- December 2011
- November 2011
- October 2011
- September 2011
- August 2011
- July 2011
- June 2011
- May 2011
- April 2011
- March 2011
- February 2011
- January 2011
- December 2010
- November 2010
- October 2010
- September 2010
- August 2010
- July 2010