I’ve had a brilliant day teaching a group how to make fan birds. This is the third time I’ve taught fan bird carving at my workshop in Cumbria and I’ve made some modifications to the way I teach which really paid off.
The course was full which meant stocking up on extra tools for everyone and gave me the opportunity to make some new knives for splitting the feathers which worked really well. Extra wide chisels also made cutting the notches easier while the piece of larch I bought for the course was a dream, splitting almost on its own into billets.

Half of the group were complete beginners to woodworking which I really like as they can learn to work wood without dust or the use of machine tools. Jim, a forester from Perth, came especially to get away from the usual noise of his work.
With this course we work through each of the stages together and I demonstrate the cuts along with the important features of the finished shape. By the afternoon we were splitting feathers and, once the body was carved it was time to spread the wings. After making so many fan birds, I’ve got a lot of confidence in how far the feathers will bend but for beginners it’s a nervous time as the culmination of their work. This is the magic of fan birds and the thing that made me want to make them myself so it’s a great reminder for me of that trepidation and wonder.


We ended up with some terrific birds, a testimony to good work from the group and I got some new ideas of ways to make the course even better for next time.


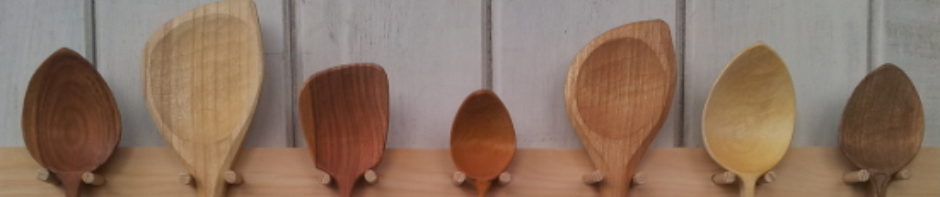
 Spoon carving is an engaging pastime which is accessible to all, requiring only a small toolkit and easily-found materials. It makes an ideal introduction to woodworking for beginners while the design elements and particular skills will engage more experienced woodworkers.


 The venue is the beautiful smallholding Sprint Mill, Burneside just outside Kendal. We’ll spend the day setting up the scythe to fit your body and then get straight out to the field to learn and practise my gentle efficient mowing style. Lots of time and a small group means I am able to watch every person and offer individual guidance on developing your technique. I’ll also teach you to hone the blade safely in the field for a razor edge and show you how to peen and care for your scythe.


 For anyone who’s new to the scythe, peening is the process of hammering out the edge of the blade to make it thinner and give it the correct bevel angle as the first stage in sharpening. It’s the same part of the sharpening process as grinding a chisel except here the work is done with a hammer and anvil or a jig. This way, there’s no chance of burning the delicate edge and you aren’t grinding away steel, rather pulling it out from the body of the scythe blade.
 Meanwhile Jane Schofield wrote with more information regarding those Castle Drogo chairs. Her husband commissioned the chairs for the restaurant following the ‘Great Storm’ of 1990 which felled many trees on the National Trusts properties. The actual timber for the chairs came from Knightshayes Court in Tiverton rather than Castle Drogo itself as I’d been led to believe. A set of photographs of the making process were also commissioned at the time and hung in the restaurant; I wonder where they are now? Something to follow up..
 From the Shakers through Jennie Alexander to David Drew the stories of the two chairs are form a heritage with each successive craftsperson adding their own identity. I am even more proud to be making them now myself and hope I can do them justice.
 We started as always with the axe which for most people is the most difficult tool as it requires strength as well as technique to use accurately. I was impressed by how Denise got on with but when, halfway through, she also admitted to being a drummer it became clearer why she had the forearm strength and good rhythm. We worked at different exercises to gain confidence and then develop the beginnings of accuracy.


 It means I have the funding to spend 3 weeks in Sweden working and studying with


-
Recent Posts
-
Privacy & Cookies: This site uses cookies. By continuing to use this website, you agree to their use.
To find out more, including how to control cookies, see here: Cookie Policy - June 2026
- April 2026
- March 2026
- December 2025
- October 2025
- August 2025
- July 2025
- June 2025
- May 2025
- April 2025
- March 2025
- February 2025
- November 2024
- September 2024
- August 2024
- July 2024
- June 2024
- May 2024
- April 2024
- March 2024
- January 2024
- November 2023
- August 2023
- July 2023
- June 2023
- May 2023
- April 2023
- February 2023
- January 2023
- October 2022
- September 2022
- August 2022
- July 2022
- June 2022
- May 2022
- April 2022
- March 2022
- January 2022
- November 2021
- August 2021
- July 2021
- June 2021
- May 2021
- April 2021
- March 2021
- February 2021
- January 2021
- December 2020
- November 2020
- October 2020
- September 2020
- August 2020
- June 2020
- May 2020
- March 2020
- February 2020
- December 2019
- November 2019
- September 2019
- August 2019
- July 2019
- June 2019
- May 2019
- April 2019
- March 2019
- November 2018
- September 2018
- June 2018
- May 2018
- April 2018
- March 2018
- February 2018
- January 2018
- December 2017
- October 2017
- September 2017
- August 2017
- July 2017
- June 2017
- May 2017
- April 2017
- March 2017
- February 2017
- January 2017
- December 2016
- October 2016
- September 2016
- August 2016
- July 2016
- June 2016
- May 2016
- April 2016
- March 2016
- February 2016
- October 2015
- September 2015
- August 2015
- July 2015
- June 2015
- May 2015
- April 2015
- March 2015
- February 2015
- January 2015
- December 2014
- November 2014
- October 2014
- September 2014
- August 2014
- July 2014
- June 2014
- May 2014
- April 2014
- March 2014
- February 2014
- January 2014
- December 2013
- November 2013
- October 2013
- September 2013
- August 2013
- July 2013
- June 2013
- May 2013
- April 2013
- March 2013
- February 2013
- January 2013
- December 2012
- November 2012
- October 2012
- September 2012
- August 2012
- July 2012
- June 2012
- May 2012
- April 2012
- March 2012
- February 2012
- January 2012
- December 2011
- November 2011
- October 2011
- September 2011
- August 2011
- July 2011
- June 2011
- May 2011
- April 2011
- March 2011
- February 2011
- January 2011
- December 2010
- November 2010
- October 2010
- September 2010
- August 2010
- July 2010