Back to post-and-rung ladderback chairs this week, steam bending the back legs for a new design of chair. The ash was lovely to shave down with the drawknife and bent very easily after about an hour in my steamer.
Actually, this isn’t a new design of chair at all but it’s not seen in the UK. The chair is the style made by Jennie Alexander in her book ‘Make a chair from a tree’, which kicked off the greenwood working revival at the end of the 70’s. If you live in America, this is a very familiar chair as it’s the one taught by Drew Langsner on his chair making courses at Country Workshops but in the UK I’ve never seen one or heard of one being built by a green woodworker. Over here the most common chair designs are those from Mike Abbott’s books (based on chairs made by Philip Clissett in the 19th century) which don’t seem to be made in the US. It’s a lovely looking chair and I’m curious how it feels so I decided to make one to add to my range; I think it will make a terrific office or cafe chair.
The main difference of the Alexander chair is in the back legs. Rather than being curved over their whole length, there is a dramatic bend between the lower and upper slat to give the curve necessary to fit the sitters back. I think this also gives a very clean and stylish look to the chairs and I’m looking forward to seeing how comfortable it will be.
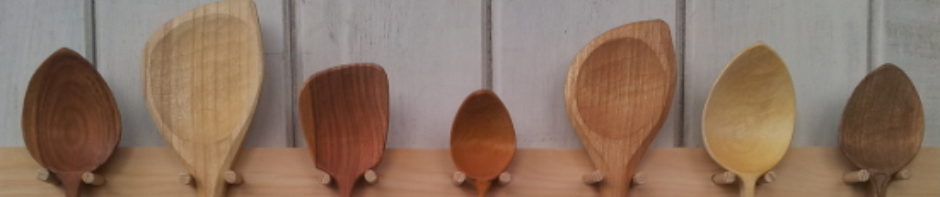
I’ve been making and selling wooden spreaders for 10 years. They’re lovely things to use in the kitchen and a perfect carving project for learning knife techniques for spooncarving. On my spooncarving courses we make a spreader together on the first day to practise the different knife holds and learn about carving with the grain. Even for more advanced carvers they make an interesting project.
Like with so many things, spreaders seem so simple and yet I find loads of opportunity for experimentation and design. This batch were carved while I was away on holiday in Austria, a quick project to pick up and play with in between other things. It’s a scrap of wood split radially from a log and easily carved using powerful pushing cuts for the initial shaping and flattening then pulls and thumb pushes to finish and add detail.
Since they’re so quick it’s a chance to try out ideas and I enjoyed coming up with new shapes and then developing them. On a couple I used kolrosing and incised engraving to highlight an element or add decoration but I most enjoyed using the facets and bevels of the blade and handle themselves to decorate. Decoration is often seen as something that is added after the spreader or spoon carving is finished but I think the two need to be part of a whole; it shouldn’t be used to cover up or compensate for a poor shape while, for me, over-decoration detracts from and confuses the underlying form. In my work I focus on creating smooth curves, clean facets and bold bevels as the foundation of good carving to produce the best forms. These are my decoration which can then be enhanced by careful and conscious embellishments.
There’s one more special ‘Learn to scythe’ course from last year that hasn’t had a mention here on the blog. I didn’t write about it at the time in the hope that there would be a photo to accompany it but it looks as if that’s not going to happen unfortunately.
After the Anna Karenina experience of 2011, a few friends and I had been wondering what might happen that could be the match of it in 2012 when I got a very interesting request. I’d been selected to teach the garden staff at Highgrove, HRH Prince Charles’ home with the possibility of HRH himself being there. I knew that HRH is very keen on gardening, agriculture as well as traditional skills and that he has a special interest in mowing with scythes through his connection to Romania so it made perfect sense that he would want to employ them on his estate.
After several weeks of planning and preparations, Christiane and I headed down to Gloucestershire. Once through security we were met by Debs Goodenough, the head gardener, and the three members of her team that we would be instructing. A very down-to-earth group, they made it clear that some were more convinced about the usefulness of the scythe and I would have to prove it’s merits to them over the course of the day, a challenge I was happy to meet.
We set up together and then went to mow in one of the wildflower meadows on the estate which, due to all the wet weather, was difficult but manageable mowing. We worked on the tai-chi style and also trimming around trees and along fencelines. Early after lunch, Debs disappeared to return a short while later in the company of HRH himself. We were introduced and shook hands then chatted in a very relaxed way about the merits of the scythe, our work training people and the beauty of the Romanian landscape.
By the end of the day they were convinced; not for every job, it’s true and some of the team more than others but they could all see how the scythe would be a useful addition to their already extensive toolkit.
The following day, the rest of the scythe gang arrived. As well as the mowing course, we’d arranged for a group of mowers to spend a couple of days working with scythes to mow at Highgrove. A dozen mowers from around the country arrived and were put to work cutting the meadow headlands. We’d been intended to cut the meadow itself but the poor weather had delayed the wildflower seeds so the crop was being left for later harvest. In many ways this was to our advantage as it meant we were employed on a wider variety of tasks in more areas of the estate; tidying ditches, trimming meadows nearer the house and clearing inside park tree guards. It all demonstrated perfectly the versatility of the scythe and we had a great time over the two days. I wonder what security thought of having so many people armed with huge blades on site?
As a treat, on the second day we were given a guided tour of the gardens which are a beautiful mixture of formal plantings, quirky corners and wilder spaces with some wonderful examples of craft as features, representing HRH’s various interests.
Oh, and there was one more lesson. A small group of us were picked out and taken to the house to formally meet HRH where he was presented with a very special scythe with an antique blade and snath custom made by Peter Vido. Being a practical chap he immediately asked if he would have the opportunity to learn to use it and Christiane was chosen to teach a private lesson. Without revealing details, she tells me that she was impressed at how hands-on he is and his ability to watch her working and quickly learn the movements. Many thanks to Debs and all the staff at Highgrove who made us feel very welcome and to David at Home Farm where we camped during the stay.
It may have only got 12 seconds in the final movie but it’s nice to know that the time we spent on Salisbury Plain in 2011 filming the scythe scenes for Anna Karenina was appreciated. We certainly made an impression on director Joe Wright as evidenced in this interview. Are you one of the “4 or 5”?
I’m a big fan of painted woodenware and have been experimenting for a while now with different recipes of homemade paint. The egg based tempera I used on my spindleback chair was lovely but takes several weeks to dry properly so I’ve been researching making milk paint. This is a soft paint that covers well and ages beautifully as the paint wears and develops a patina. Milk paint was traditionally made by souring the milk to separate out the curds which make the base for the paint however I’ve been looking for a simpler alternative which is easy to make up in small quantities. In the US powdered milk paint is available in various colours which are simply mixed up with water and this is what I want for my own work. I can then make up a dry batch with the colour I want and then mix up just the quantity needed knowing it will be the same shade each time.
The recipe I’ve been using is based on powdered milk paint which you buy in the supermarket along with bicarbonate of soda from the baking aisle. Lime is sometimes used but I prefer bicarbonate of soda as it’s safer, easy to buy in small quantities and some pigments are not compatible with lime. You can also use borax which is available in chemists and makes a good alternative to the bicarb.
Here’s my recipe:
4 parts milk powder
1 part bicarbonate of soda
1 part pigment
6 parts cold water
Simply mix the powders together then add the water and stir well. Leave the paint to sit for 1 hour then stir again and paint. Milk paint dries quickly so don’t hang around once you’ve started using it and be careful not go back over areas as you can wipe the paint back off making a mess. Despite it being touch dry in 15mins of so, if you’re painting on extra coats make sure you let the paint dry fully, ideally overnight, as again the paint will come off if it’s not properly cured. I’ve been using earth pigments as I like the colours and using natural pigments seems to fit better with milk paint though artist’s pigments will work and have some really vibrant colours which are appealing. The sample in the photo is a piece of dry ash painted using red ochre pigment. You can see the difference between a single layer and two coats of paint. In the top corner I’ve painted over the red with black, a traditional combination for windsor chairs.
There’s still plenty more to learn about working with milk paints so if you’ve suggestions or advice, share them in the comments.
This photo shows why I was so keen to get turning beads with the skew chisel under my belt. After years of making post and rung chairs I’ve finally set my sights on making some windsor chairs so I’m investing time into building skills and sourcing tools for the work.
It’s taken me this long to get around to making a windsor because, up to now I’d never found them that interesting until I discovered American style of windsor chairs. The shapes are so much bolder to my eye than on English windsors with graceful curves and dynamic angles; a woodworking friend says they look like ‘a faun, ready to spring up and run away’. It’s that kind of movement I’ll be trying to achieve with my own chairs and a lot of it comes from the dramatic turning on the legs along with their splay. I’ve been inspired to this project principally by the work of Curtis Buchanan and Peter Galbert whose work you should check out if you’re interested in windsor chairs, They’re a tough act to follow but really something to aim for.
This leg is turned from a piece of birch as a reference model to use when I’m turning the real sets of chair legs which will be from some good straight ash I have.
It may have been out for a while now but Christiane only just went to see Anna Karenina (2012) at her local cinema in Austria last week which brought back some great memories and reminded me that I’ve never posted up any of the photos here.
When we were all hired to work as extras for the mowing scenes we of course signed release forms which included a lengthy legal section on not disclosing details of the film before its release. Officially we weren’t supposed to have cameras on set but in reality the crew were fairly relaxed about it and, as you can see, even posed for a few shots. Unfortunately, since we were all mowing at the time, there’s no pictures of the line of mowers working their way across the plain which did look fantastic and was featured in the trailer. There’s pics of the amazing ‘snath-cam’, folk on set in their costumes, me making and fitting scythes for Dohmnall Gleeson, Conor McCarry and Steve Evets (Levin, Young Peasant & Theodore) and my friend Beth doing her ‘convincing Russian peasant’ audition.
[gigya src=”http://www.flickr.com/apps/slideshow/show.swf?v=71649″ width=”600″ flashvars=”offsite=true&lang=en-us&page_show_url=/photos/66173272@N02/sets/72157632419213181/show/&page_show_back_url=/photos/66173272@N02/sets/72157632419213181/&set_id=72157632419213181&jump_to=” allowFullScreen=”true” ]
In Cumbria there’s a long tradition of harvesting oak bark for tanning leather and last spring I took part in a group day with the local Coppice Association to harvest bark from Moss & Height’s Spring Wood. The bark is sold to a tannery in Devon and the funds used to help finance the Coppice Associations work.
While we were there I was asked to build a bench from some of the peeled poles as part of a garden makeover. I spent a good while selecting the right pieces for a look which would be natural but not too wild and making the most of the curves in the wood. One thicker pole was cleft to make matching back legs with longer cleft pieces used to make a solid and comfortable seat. I like the texture of the peeled oak and the bench is looking good already in it’s new home, it’ll be even better as it weathers.
Like lots of turners, whether on a pole-lathe or powered lathe, it’s the skew chisel that’s always caused me headaches. With a life of it’s own and seemingly no other intention than to mess up details at the last moment I’ve tended to shy away from it in the past or approach it with hesitation and caution. Well, no more of that, I’ve decided to go into 2013 with with me and the skew as working partners so I spent an evening watching whatever videos I could find online into just how people manage to turn over smooth beads without digging in. I’ve not posted any links because, honestly, there wasn’t really one video that had it all. In lots the camera seemed so far away or at such an angle that you couldn’t see the action or there was a perfect bird’s-eye view of the spinning timber but no idea what the person holding it was doing. Watch enough of them though and, assuming everyone’s doing it the same, you can piece together enough of a theory to take to the lathe; it worked for me.
I’m not going to add my own video to the existing soup but I’ll add these tips that helped me:
Get the skew sharp first.
Make a good sized V notch before you roll the bead so you’re not trying to work through too much wood.
The heel of the tool leads but the action really takes place with at the end of the handle which you move up and out in a smooth arc, it’s a big movement here for the small sweep of the bead.
One of the many advantages of the pole-lathe is that the work is turning much more slowly so the whole thing is safer and it will stop instantly whenever I want, by thought control. Show me an electric lathe that can do that.
Life is seasonal and happily so is my work schedule.
While the rest of the year are full with shows, courses and scythes, the winter period especially after Christmas is a time when I can make my plans for the year ahead but also try out some of the ideas I didn’t get round to during the rest of the year, experiment with things and inspire myself anew.
One of my plans involves quite a bit of pole-lathe turning, something I’ve always done but never mastered to my satisfaction. So I spent part of Christmas day grinding my turning tools on the Tormek figuring that having everything in tip-top condition would make the process go that bit easier and I’ve a nice soft birch log waiting in the workshop to work with them. And once the grinder’s out and working, you might as well do everything.
Privacy & Cookies: This site uses cookies. By continuing to use this website, you agree to their use.
To find out more, including how to control cookies, see here:
Cookie Policy

 I’ve been making and selling wooden spreaders for 10 years. They’re lovely things to use in the kitchen and a perfect carving project for learning knife techniques for spooncarving. On my spooncarving courses we make a spreader together on the first day to practise the different knife holds and learn about carving with the grain. Even for more advanced carvers they make an interesting project.


 Many thanks to Debs and all the staff at Highgrove who made us feel very welcome and to David at Home Farm where we camped during the stay.

 This photo shows why I was so keen to get turning beads with the skew chisel under my belt. After years of making post and rung chairs I’ve finally set my sights on making some windsor chairs so I’m investing time into building skills and sourcing tools for the work.

 Well, no more of that, I’ve decided to go into 2013 with with me and the skew as working partners so I spent an evening watching whatever videos I could find online into just how people manage to turn over smooth beads without digging in. I’ve not posted any links because, honestly, there wasn’t really one video that had it all. In lots the camera seemed so far away or at such an angle that you couldn’t see the action or there was a perfect bird’s-eye view of the spinning timber but no idea what the person holding it was doing. Watch enough of them though and, assuming everyone’s doing it the same, you can piece together enough of a theory to take to the lathe; it worked for me.


