As a craftsman, I can’t go to London and not visit the V&A so I was pleased to have a couple of hours in there before my QEST interview, helped calm my nerves to see all that great work from over the ages. These are a few snaps I took, mostly through a glass case and with poor lighting which don’t do the works justice – if you can, get there yourself and enjoy it in real life but make sure you’ve plenty of time.
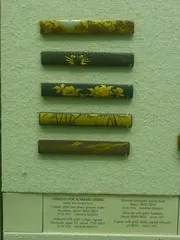
First, a visit to the Japan Room and delight at seeing the sword guards and handles for scabbbard knives. I’d enjoyed them before but was looking with new eyes since I’ve discovered the sublime work of classical metal artist Ford Hallam. The tiger handle, signed Masayuki from around 1750-1800, reminded me of his video ‘Utsushi – in search of Katsuhira’s tiger‘ which is transfixing. The sword guard, depicting Sailing boats and Mount Fuji is signed Toryu Hagen (1804-1876).

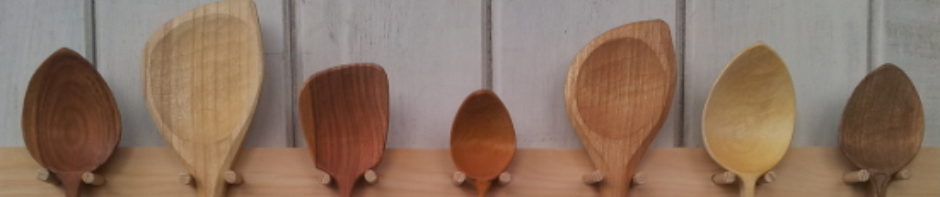
Next, spoons. If you want wooden spoons you’re better off visiting the Museum of English Rural Life in Reading, I couldn’t find any wooden spoons here but this display of metal spoons from the Koryo period of Korea caught my eye, particularly for the shadows they cast.

You have to find your way all the way to the top floor to get to the Furniture gallery and it’s only one room when you do, though of course there’s other furniture around the museum. The reward is a display, mostly of chairs, from a wide range of styles and materials. Favourite of mine were the Thonet display and Gio Ponti’s Superleggera chair.


Finally a few more contemporary pieces, including the classic ‘This Mortal Coil’ bookcase by Ron Arad and a single case intriguingly labelled ‘Handmade: Traditional Skills’ and featuring a basket by Jenny Crisp alongside one of David Pye’s bowls.


 For anyone who’s new to the scythe, peening is the process of hammering out the edge of the blade to make it thinner and give it the correct bevel angle as the first stage in sharpening. It’s the same part of the sharpening process as grinding a chisel except here the work is done with a hammer and anvil or a jig. This way, there’s no chance of burning the delicate edge and you aren’t grinding away steel, rather pulling it out from the body of the scythe blade.
 Meanwhile Jane Schofield wrote with more information regarding those Castle Drogo chairs. Her husband commissioned the chairs for the restaurant following the ‘Great Storm’ of 1990 which felled many trees on the National Trusts properties. The actual timber for the chairs came from Knightshayes Court in Tiverton rather than Castle Drogo itself as I’d been led to believe. A set of photographs of the making process were also commissioned at the time and hung in the restaurant; I wonder where they are now? Something to follow up..
 From the Shakers through Jennie Alexander to David Drew the stories of the two chairs are form a heritage with each successive craftsperson adding their own identity. I am even more proud to be making them now myself and hope I can do them justice.
 We started as always with the axe which for most people is the most difficult tool as it requires strength as well as technique to use accurately. I was impressed by how Denise got on with but when, halfway through, she also admitted to being a drummer it became clearer why she had the forearm strength and good rhythm. We worked at different exercises to gain confidence and then develop the beginnings of accuracy.


 It means I have the funding to spend 3 weeks in Sweden working and studying with
  The interview was just 20 minutes long with a panel of craftspeople and designers, most of whom are Royal Warrant holders for their craft and including two woodworkers. I did feel quite daunted to be presenting to them but I’d had some good advice in advance that it would be relaxed and that proved to be right. I took a selection of my wooden spoons, a large carved bowl and a shrink pot container to show and, by the time I’d got in the room and said hello, the various members had the work in their hands – always a good sign. I’d been told that I would have 10mins to present my proposal followed by questions from the panel but actually I talked for just a couple of minutes before they jumped in with questions on how I work, the advantages and problems of greenwood, why I want to learn from Fritiof, pricing my craft, creating a carved finish instead of sanding and where I think I’m headed. It was all pretty intense but exhilerating at the same time and was over in a flash; it reminded me of teaching at Spoonfest – trying to put across a lot of information about what I do in a short time to a group of highly interested people.
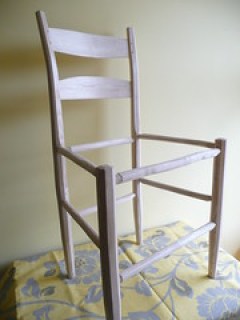 I’ve just finished assembling the frame for the Jennie Alexander side chair. I altered the rungs slightly, to give this chair the same seat size as my other dining chairs and put in just 4 rungs with different postitions. I wanted to lighten the look of the chair and give it some ‘lift’ so it appears more free. I’m confident that the structure, based on oval tenons and interlocking joints in the seat, is still strong enough for everyday use and I’m very happy with the final look.
 My second museum on the trip through Scotland was the


 My Learn to Scythe course in May is now full with places booking up on the June and September dates too. I’ve been getting steady interest since before Christmas and it’s a great indication that the interest in scything is picking up as people get away from powered garden machinery and use the scythe instead. It’s also encouraging that so many people recognise that mowing is a skill that’s worth investing time in to learn.
 I have two more Learn to Scythe courses in Cumbria on 28 June and 7 Sept 2013.
 On my way up to teach a ‘Learn to Scythe’ weekend at Forres last summer I took the opportunity to visit two museums on the way and see if I could find out more about the Scottish scythe. In 2011 I’d been given a Scottish snath of the familiar Y shape and was interested to find out why it had developed and it’s use.


-
Recent Posts
Categories
-
Privacy & Cookies: This site uses cookies. By continuing to use this website, you agree to their use.
To find out more, including how to control cookies, see here: Cookie Policy